
If you’ve just opened the Air Vision Systems (AVS) cable calculator and hit a wall at the first question – “which Starlink system do you have?” – you’re not alone.
Starlink has released several terminals over the years, and unless you were paying close attention when you bought yours, it’s not always obvious which one is sitting on your roof or tucked in your vehicle. The box may be long gone, the model name might not mean much, and searching online often returns confusing results that mix up older and newer hardware.
The good news is that identifying your terminal takes less than two minutes if you know what to look for. This guide walks you through the key differences between the two terminals most people in New Zealand and Australia are currently running – the Starlink Gen 3 Standard and the Starlink Mini – so you can get straight to the right cable setup for your install.
The Two Terminals You’re Most Likely to Have
If you purchased Starlink in New Zealand or Australia from late 2024 onwards, you almost certainly have one of two terminals: the Gen 3 Standard or the Starlink Mini.
Earlier hardware, including the original round dish and the rectangular Standard Actuated terminal, is still in use, but new activations and replacement units are now shipping as Gen 3 Standard or Mini. If you are on an older terminal, the physical differences below will still help you confirm what you have.
Here’s the quick version before we go into detail:
The Gen 3 Standard is a larger rectangular dish designed for permanent or semi-permanent installation. It is the main residential and commercial terminal. It connects to your router via a single cable that carries both power and data.
The Starlink Mini is a compact, portable terminal roughly the size of a laptop. It is designed for travel, vehicles, and off-grid use where size and weight matter. It connects differently from the Gen 3 and has different power requirements.
Knowing which one you have matters because the cable options, power sources, and maximum run lengths are completely different for each terminal – which is exactly what the Air Vision Systems (AVS) cable calculator is built around.
All Starlink Terminals: A Visual Guide
The cards below cover every terminal you are likely to encounter, from the original 2020 hardware through to the current Gen 3 Standard and Mini. The two supported by the Air Vision Systems (AVS) cable calculator are highlighted in green.
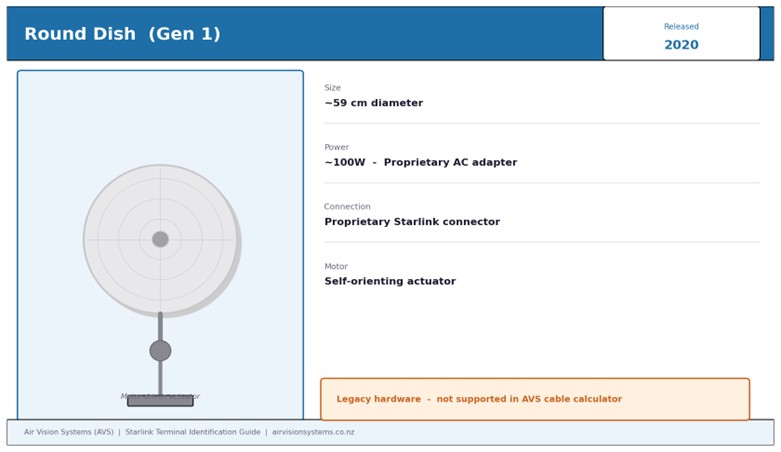
Round Dish (Gen 1) – Released 2020. The original Starlink terminal, supplied to beta testers. Now legacy hardware.
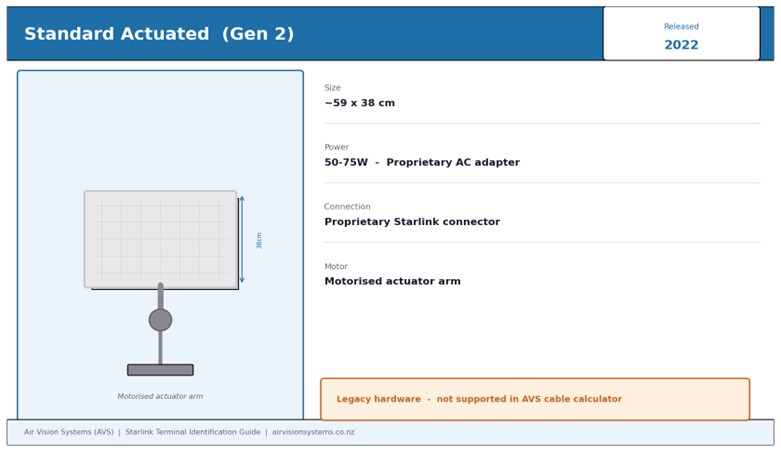
Standard Actuated (Gen 2) – Released 2022. The first widely available rectangular terminal, with a motorised actuator to orient the dish. Now legacy hardware.
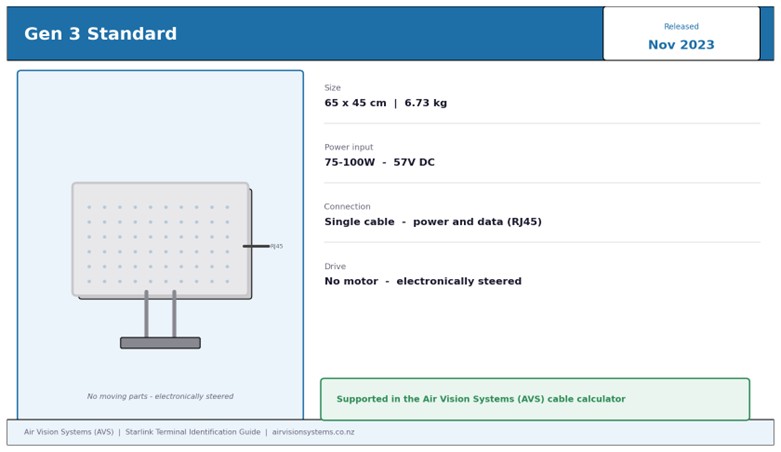
Gen 3 Standard – Released November 2023. The current full-size residential and commercial terminal. No moving parts – electronically steered phased array. Supported in the Air Vision Systems (AVS) cable calculator.
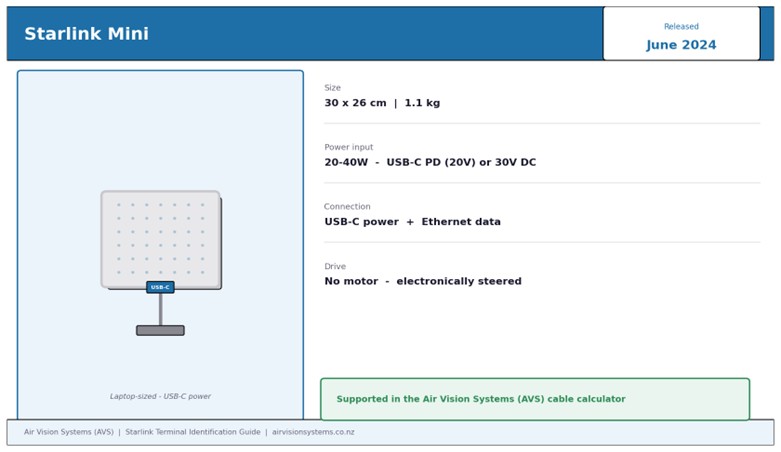
Starlink Mini – Released June 2024. The current portable terminal. Laptop-sized, USB-C powered, designed for travel and vehicles. Supported in the Air Vision Systems (AVS) cable calculator.
How to Identify Your Terminal by Look
The fastest way to identify your terminal is to look at it.
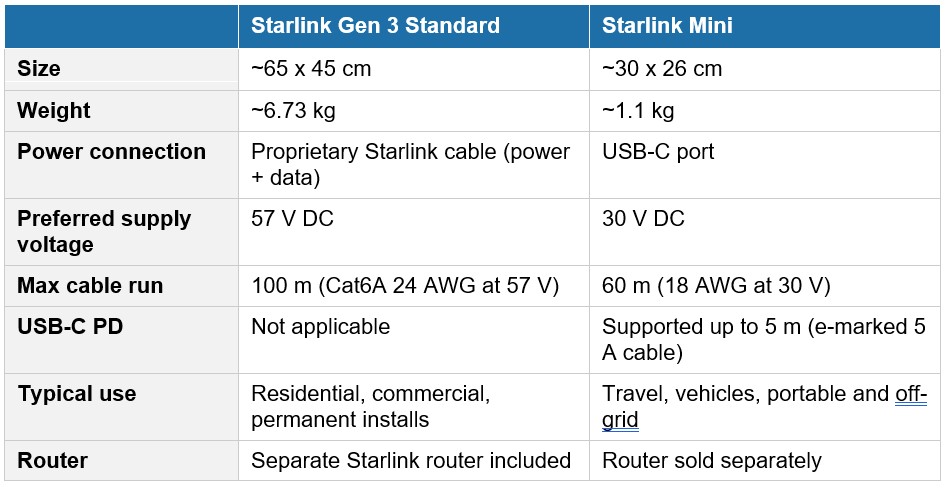
The Gen 3 Standard is a flat rectangular dish, wider than it is tall, with a clean white finish and a single integrated cable that exits from the back of the unit. The dish measures approximately 65 x 45 cm. It is mounted on a kickstand or pole mount and sits at a fixed angle. The cable that runs from the dish to your router carries both power and data – there is no separate power cable going to the dish.
The Starlink Mini is noticeably smaller – approximately 30 x 26 cm, similar in size to a laptop or large tablet. It has the same white finish but is much lighter and thinner. The clearest single identifier is the USB-C port for power – if your dish has a USB-C connection, you have a Mini.
If you have an older terminal, the round dish is unmistakable – circular with a motorised arm at the base. The Gen 2 Standard Actuated is rectangular but heavier and thicker than the Gen 3, with a visible motorised actuator arm that tilts and rotates the dish automatically.
If you are still unsure, turn the dish over and look at the back. The model information is printed on a label on the rear of the unit.
How to Identify Your Terminal by App or Account
If the dish is mounted and you can’t easily check the back of the unit, your Starlink account and app will confirm the model in seconds.
Via the Starlink app: open the app on your phone and tap the settings icon. Navigate to Starlink, then Advanced. Your terminal model is listed here under device information. It will show either “Standard Gen 3” or “Mini” alongside the serial number.
Via your online account: log in at starlink.com, go to Manage, and select your service address. Your terminal model is displayed under the hardware section of your account details.
Via the serial number: if you still have the original box or documentation, the serial number label includes the model name. You can also enter your serial number at starlink.com to confirm the hardware associated with your account.
Any of these three methods will give you a definitive answer in under a minute, and all three will show you exactly the model name to select when you open the Air Vision Systems (AVS) cable calculator.
Why It Matters for Your Cable Setup
Once you know which terminal you have, the cable calculator can do its job properly. But it helps to understand why the two terminals need different answers.
The Gen 3 Standard and the Starlink Mini are not just different in size – they are fundamentally different in how they receive power and how far that power can travel down a cable.
The Gen 3 operates at 57 V DC. That high voltage keeps current low, which means voltage drop along the cable stays within acceptable limits even over long runs. A correctly specified Cat6A cable can carry both power and data to a Gen 3 over distances of up to 100 m.
The Mini operates at either 20 V USB-C Power Delivery or 30 V regulated DC. Lower voltage means higher current for the same power load, which means voltage drop becomes a limiting factor at much shorter distances. The maximum compliant run for a Mini on 30 V DC is 60 m on 18 AWG cable, and USB-C PD is limited to 5 m with a certified e-marked 5 A cable.
Put the wrong terminal into the calculator – or guess – and the cable recommendation will be wrong. You could end up with a cable that is too short, too thin, or paired with the wrong power source for your actual hardware.
Getting your terminal right at step one takes two minutes. Getting your cable wrong costs significantly more to fix.
Quick Reference: Gen 3 Standard vs Mini at a Glance
If you want to confirm your identification before moving to the calculator, this summary covers the key physical and electrical differences between the two current terminals.
A terminal matching the Gen 3 column means you are ready to select Starlink Gen 3 in the calculator. For the Mini column, select Starlink Mini. Still unsure? Check the label on the back of the dish or confirm via the Starlink app as described above.
The quickest way to confirm is to check the back of your dish for the model label, or open the Starlink app and navigate to Settings, then Starlink, then Advanced. Your terminal model will be listed there. Once you have confirmed whether you have a Gen 3 Standard or a Starlink Mini, the Air Vision Systems (AVS) cable calculator will walk you through the rest – power source, cable length, and product recommendation in three steps.
Select your Starlink system, choose your power source, and enter your required cable length. The Air Vision Systems (AVS) cable calculator matches your setup to the right cable and power components in seconds.
Use the Air Vision Systems (AVS) Cable Calculator
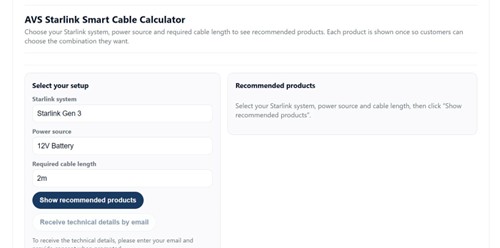
The Air Vision Systems (AVS) Starlink Smart Cable Calculator – your first step is selecting the correct terminal.
Frequently Asked Questions
I have an older Starlink dish – is it a Gen 3 or something else?
If your dish is round, you have the original first-generation Starlink terminal, which is no longer sold but still active on some accounts. If your dish is rectangular but bulkier and heavier than the dimensions listed above, you may have the Standard Actuated Gen 2. Neither of these are the Gen 3. The Gen 3 is slimmer and lighter than its predecessors, with a cleaner cable exit and no motorised actuator arm. If you are unsure, check the label on the back of the unit or confirm via your Starlink account. The Air Vision Systems (AVS) cable calculator is optimised for Gen 3 Standard and Mini terminals.
Can I use my Gen 3 cables with a Starlink Mini?
No. The Gen 3 uses a proprietary Starlink cable that carries both power and data in a single run. The Mini uses a USB-C connection for power and a separate Ethernet connection for data. The connectors, voltages, and cable specifications are completely different. Using Gen 3 cables with a Mini, or vice versa, is not possible without an adapter and is not recommended. If you are upgrading or changing terminals, you will need to reassess your entire cable setup.
I bought my Starlink second-hand – how do I find out which model it is?
Check the label on the back of the dish – the model name is printed there regardless of who originally purchased the hardware. You can also log in to your Starlink account at starlink.com once the hardware has been transferred to your account, and the model will appear under your hardware details. If the transfer has not been completed, the seller should be able to confirm the model from their account or from the original packaging.
Does it matter which terminal I have if I’m just using the standard Starlink power supply?
Yes, it still matters. The Gen 3 and Mini have different power supplies that are not interchangeable. The Gen 3 adapter outputs 57 V DC while the Mini adapter outputs 30 V DC. Even if you are using the standard supplied adapter and running a short cable, selecting the correct terminal in the Air Vision Systems (AVS) cable calculator ensures you get the right cable type, connector, and length recommendation for your specific hardware.
My Starlink app shows a different model name – what does that mean?
Starlink occasionally updates the terminology used in the app and on their website. An app showing “Standard” without a generation number, it may be referring to an earlier terminal. “Standard Gen 3” or simply “Gen 3” confirms you have the current generation hardware, while “Mini” confirms the Starlink Mini. If the name in your app does not match either of those descriptions, check the physical label on the back of the dish for the definitive model identification.
Two Minutes Now Saves a Costly Mistake Later
Identifying your Starlink terminal is the single most important step before you plan any cable run or power setup. Everything else – the cable type, the conductor gauge, the power source, the maximum run length – flows from knowing which terminal you have.
The Gen 3 Standard and the Starlink Mini are built for different purposes, connect differently, and power differently. Treating them as interchangeable when it comes to cabling is one of the most common and most avoidable mistakes in a Starlink installation.
Take two minutes now to confirm your terminal using the methods in this guide. Then let the Air Vision Systems (AVS) cable calculator do the rest – it is built around the engineering specifications for both terminals and will match you to the right cable and power components for your exact setup.
Air Vision Systems (AVS) manufactures cables specifically for Starlink installs – sized, terminated, and tested for the job. Once you know your terminal, we can sort everything else.
Use the Air Vision Systems (AVS) cable calculator to get the right cable for your terminal, power source, and run length.
Use the Air Vision Systems (AVS) Cable Calculator
Browse Air Vision Systems (AVS) Starlink Cables